

Task 5 - 3D Printing a minion BATMAN (Individual Task)
- EmadMaximos
- Sep 30, 2018
- 7 min read

Updated: Nov 13, 2018


Task Objective
The objective of this individual task was to pick any design we want or like from the internet and 3D print it, but on one condition which was that the design's overall dimensions should not exceed 3 cm or its printing time should not be more than 30 minutes. The main idea behind this was to get us to know more about the 3D printing techniques and make us become more familiar with using a slicer called "Ultimaker Cura" to set and prepare the design file prior to printing in addition to learning how to use, operate and troubleshoot the 3D printer as a machine which led us to know more terminology and information about 3D printing in general. The 3D printer we worked on was Ultimaker 2 Extended +. Moreover, we had the option of making a design of our own using any CAD program to learn how to optimize in our design to output the most efficient and economic print as much as possible.
More about the Ultimaker 2 Extended +
Ultimaker 2 Extended + is a Cartesian - type 3D printer, where the extruder translates in the X-Y plane while the bed is leveled upwards or downwards along the Z direction, that is engineered to perform. It is reliable, efficient, and user-friendly. Thanks to its support of a wide range of materials (PLA, ABS, CPE, CPE+, PC, Nylon, TPU 95A), making it considerably suitable for a huge variety of applications from prototypes to customized tools. It is a great all-around 3D printer that delivers consistent results. You can find more details and information about this printer and many other Ultimaker 3D printers on their website. (Website's link: https://ultimaker.com/en/products/ultimaker-2-plus/specifications)
Steps of printing the part on Ultimaker
First and foremost, I had to find the design that I will print. There are many websites, that one can find, which offer a very wide variety of 3D designs that can be printed. However, one of my personal favorites that possess various immense design libraries is website called "MyMiniFactory" from which I chose my "Batman" design. And here is the link for the website if you want to take a look at it. (Website's link: https://www.myminifactory.com/)
After choosing your design, comes the printing process which is divided into two main steps: (a) Preparing the design file on "Ultimaker Cura" and (b) 3D Printing the design.
a) Preparing the design file on "Ultimaker Cura":
After I downloaded my design file from the website above, which had a ".stl" extension, I had to work with it on a slicer supported by Ultimaker called "Ultimaker Cura 3.4.1" that converts the extension of the file from ".stl" to ".gcode" so that the file is converted to a gcode file which is placed on an SD Card and read by the 3D printer to execute the design. The steps of handling with the design file on Cura were as follows:
1. Open "Ultimaker Cura 3.4.1".
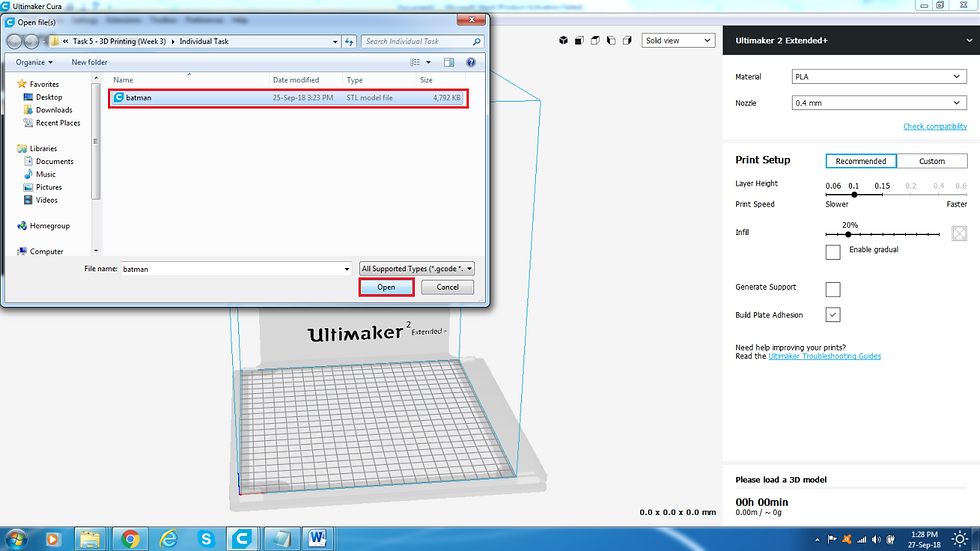
2. Open the chosen file by clicking "File", choose "Open File(s)", navigate for your test file (.stl), and click "Open" as shown in the following figures.

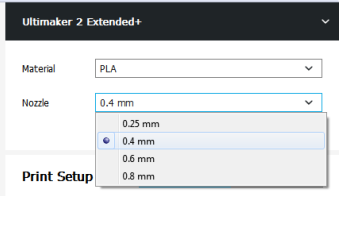
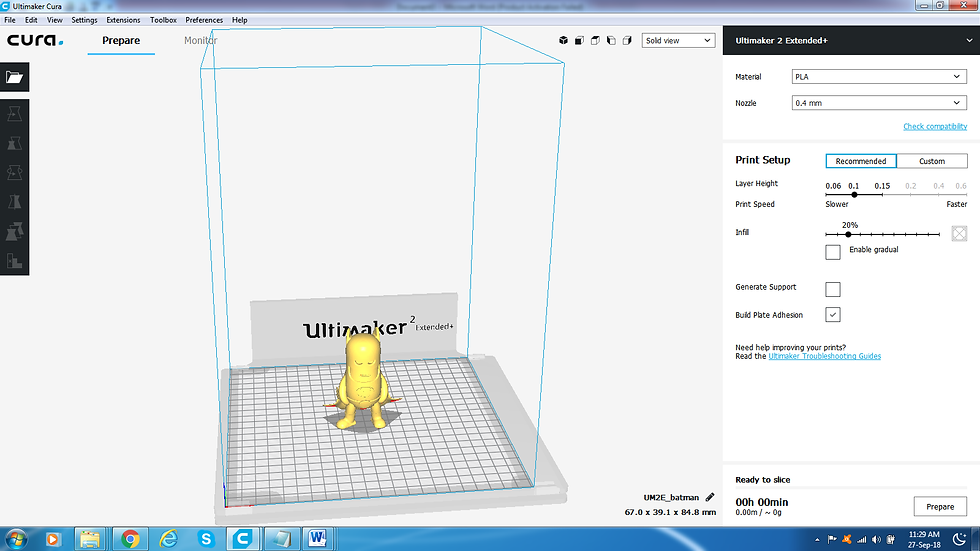
3. After importing the file to Cura, choose the printer model to be "Ultimaker 2 Extended +", choose the material to be "PLA", and choose the nozzle width to be "0.4 mm" which is the default width as shown in the figures below.


4. Now, I needed to rotate the design, as shown in the following figures, so that it is standing vertically upwards on the printer's bed which is the most suitable orientation for it and also the one that takes the least printing time. I select the design and go to the "Rotate" icon on the far left of Cura's window as shown.

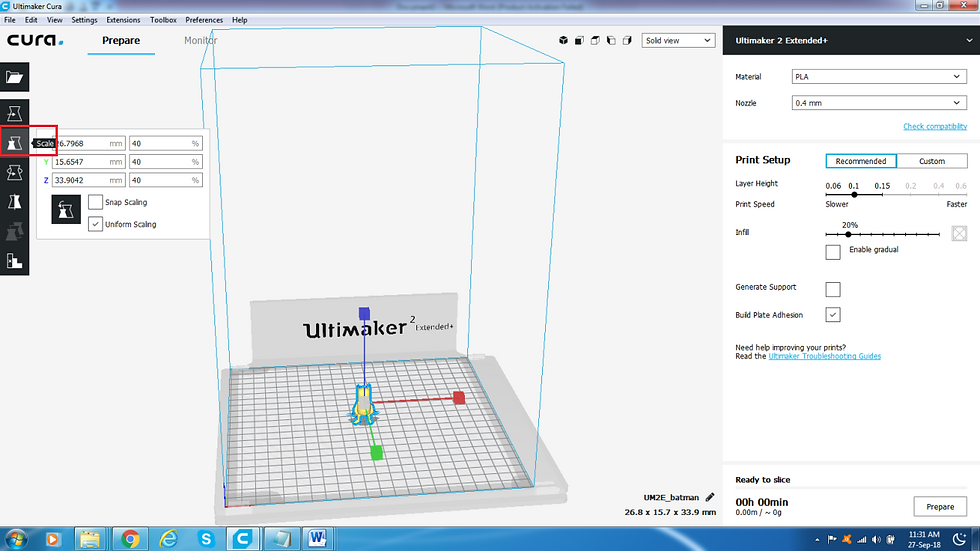
5. Afterwards, the design had to be scaled down to 40% of its original size, as shown in the figure below, to apply the condition stating that the overall dimensions should not exceed 3 cm. I select the design and go to the "Scale" icon on the far left of Cura's window as shown. As a result, the design's height became exactly 3.3 cm after scaling and so the condition was successfully applied.
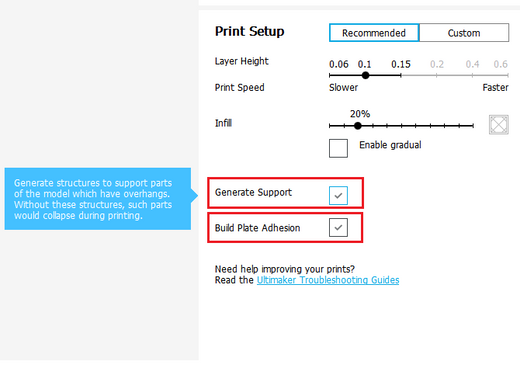
6. In the "Print Setup" part I kept the Recommended Settings with layer height equal to 0.1 and infill percentage equal to 20%, which are considered ideal settings, as shown below. Also, I ticked on the tick box called "Generate Support" so that the printer is able to auto generate supports to help the extruder reach the parts of the design that are floating in mid air and require supports below them as any print is formed layer by layer. (Note: Make sure that the tick box called "Build Plate Adhesion" is also ticked on so that the printer first forms the raft or skirt, which is the basis upon which a part is printed, and is essential to make the part stick firmly to the bed while being printed without falling.)


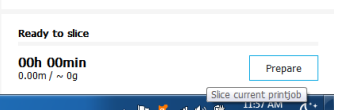
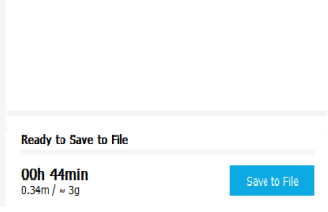
7. To start slicing the file (converting it to gcode), click "Prepare" to get the design sliced and ready to print, it will also give you the printing time and the resultant weight of the printed part as shown in these figures. As you can see below, the printing time was 44 minutes which is a little bit more than half an hour so this condition was not accurately met. However, since the overall dimensions of the part did not exceed 3 cm, as mentioned above, I was able to proceed with my design.


8. After the slicing is done, you can choose Layer View, shown in the figures below, to see how the printer will build the part. As in this view you have tick boxes to show the infill, shell, helpers/ supports, travels, and detailed layers along with the top and bottom layers too. You can change anything if you want, by ticking or unticking the respective boxes, to see more details or to reduce the quality to print faster.


Now, lets briefly discuss the meaning of each of these terms:
Travels/ Enable Combing: Combing keeps the print head within the interior of the print while traveling from one point in the print to another. The printer won’t retract on these points and will simply do a travel move. This reduces the number of retraction moves but will increase the travel distances. If combing is disabled the print head will move straight from one point to another, choosing the shortest route, and will always retract. For more detailed information about the travels a 3D printer makes while printing a part, please visit this link. (Link: https://ultimaker.com/en/resources/20420-travel)
Helpers/ Supports: 3D printing, like everything else on Earth, is limited by gravity. Despite its amazing ability to turn spools of plastic into toy soldiers, giant swords, and other fun models, 3D printers don’t print well over thin air! To combat this problem, slicer software adds all sorts of 3D printed supports alongside your model as shown in the figure below. And once the whole thing is printed, those supports can be removed. For more detailed information about supports and their importance in the 3D printing process, please visit this link. (Link: https://all3dp.com/2/3d-printing-supports-guide-all-you-need-to-know/)

Shell: Known as outline or outer perimeter, the shell represents the outer wall of a 3D print used to describe the maximum thickness given to the outer wall. Printing with 4 shells means that your objects’ outer wall will be 4 times your 3D printer nozzle's diameter (i.e 4 X 0,4mm = 1,6mm outer wall).
Infill: Refers to the structure that is printed inside an object. It is extruded in a designated percentage and pattern, which is set in the slicing software like "Cura"as shown in the figure below. Infill percentage and pattern influence print weight, material usage, strength, print time and sometimes decorative properties. Generally speaking, the higher the infill percentage, the stronger the print, but the longer it takes to print. In most cases, 5% – 20% infill is sufficient. 100% infill is very rarely used.

Detailed layers: Within the context of additive manufacture processes, a layer is the individual planar thin section of the object being created. Before being printed, the 3D object's geometry is sliced into a large number of these horizontal sections or layers to be subsequently manufactured in an ordered sequence, with each of the layers adhered to the previous one. The larger the number of layers for a given object, the thinner they are and the higher the vertical resolution of the object produced. For more detailed information about the concept of making layers in the 3D printing process, please visit this link. (Link: https://www.sculpteo.com/en/glossary/layer-definition/)
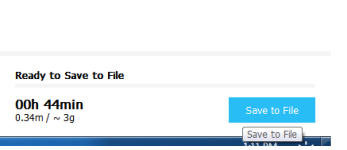
9. After you are done, click "Save to File" and save the design file with .gcode extension in the place you want as shown in the figures below.

b) 3D Printing the design:
As stated before, the printer used was "Ultimaker 2 Extended +" and the material used for printing was "PLA" abbreviated for Polylactic Acid which is a plastic-type material that has many uses in the digital fabrication field, especially 3D printing, in addition to being non-biodegradable making it harmless for human usage. The steps of printing the design included the following:
1. Upload the gcode extension file on the SD card of the printer, shown in the following figure, and insert the card inside the printer.


2. Press "Print" and choose the file to be printed from the list that appears on the small screen at the bottom of the printer. I choose my file "batman" then the printer will start printing automatically as shown in the figures below.


This video shows how to "Find" and "Print" your design:
3. Wait for the printer to heat up the bed and extruder to their set temperature, which is detected by a heat sensor prior to printing, as shown in the figure.

4. Once heating is done, the bed is leveled up in the z direction through a leveling screw and printing commences. I waited and kept close watch on the part while being printed, to handle and troubleshoot any problem that might occur, and took photos for different phases of the printing process as shown in the following figures.


And here is a time-lapse video showing the test part while being printed:
5. When printing finishes, the bed levels down again and starts cooling. Wait for the cooling process, and then you are ready to receive your part as shown in figures.


Here is the part before removing the base raft and supports:

6. Finally, use the different printing tools to remove the base raft and supports and you have your final cleaned up part as shown. :D

Conclusion
The process of printing a favorite design that we like on the 3D printer was very interesting and fun too as through the process I got to know more about 3D printing including its tips, techniques, and issues. Moreover, I learned how to set and prepare any design file on the slicer "Ultimaker Cura" and most importantly how to work with the amazing Ultimaker printer to print anything I want! So come visit us at FLiNC (FabLab in New Cairo) and may be I can tell you everything I learnt about 3D printing and provide you with the needed assistance to design and print something you like too. :D


Comments