Task 10 - DC Motor Control using Arduino and Bluetooth (Group Task)
- EmadMaximos
- Oct 21, 2018
- 5 min read
Updated: Oct 22, 2018
Task Objective
The main objective of this group task was also to control the motion of a DC motor making it move forwards, backwards, and stop, exactly like the previous two tasks. However, in this task we were using a Bluetooth module chip along with the Arduino to send a serial input signal to control the motor's directions. Therefore, the task was focused on controlling the motor's motion using Bluetooth as a communication protocol to better understand how this protocol works. Our group consisted of four members.
Introduction to Bluetooth
Bluetooth is short-range, wireless data protocol designed for sending and receiving data over a secure 2.4GHz network. It was originally conceived during the late 90’s as an in-house project at Nokia, however, it quickly spread to become a standard for wireless data. The first mainstream Bluetooth protocol was launched as Bluetooth 1.0 and has had several iterations through to the current Bluetooth 4.x and Bluetooth 5. Bluetooth 4.0 was important because it introduced the sub-standard known as Bluetooth Low Energy (also known as Bluetooth LE or BLE). Bluetooth 4.x is also known as Bluetooth Smart as it enables backwards compatibility for both traditional Bluetooth and Bluetooth LE.
Traditionally Bluetooth was designed to transmit large amounts of data over a short distance with products like hands-free headsets for phones, and speakers in mind. However, Bluetooth LE is a newer, low-power standard which uses the same carrier system and basic protocol, however, it’s designed for battery operated systems which only need to send small amounts of data to another device, using sleep mode in between transmissions, and is perfect for mobile, power-conservative devices. Bluetooth LE is also a standard feature of today’s smartphones and computers and because of the simplified nature of BLE, it’s much easier to setup communication with these devices.
Circuit Components that were used in the task:
1. Arduino Uno R3.
2. DC Motor.
3. Relays (two of them).
4. Bluetooth Module HC-05.
What is "Bluetooth Module HC-05" ?
HC-05 Bluetooth Module is an easy to use Bluetooth SPP (Serial Port Protocol) module, designed for transparent wireless serial connection setup. Its communication is via serial communication which makes an easy way to interface with any controller or Personal Computer (PC). The module provides switching mode between master and slave modes which means it can be used to either receive or transmit data.
Module Specifications:
Model: HC-05.
Input Voltage: DC 5V.
Communication Method: Serial Communication.
Master and slave mode can be switched.
Pin Definition:
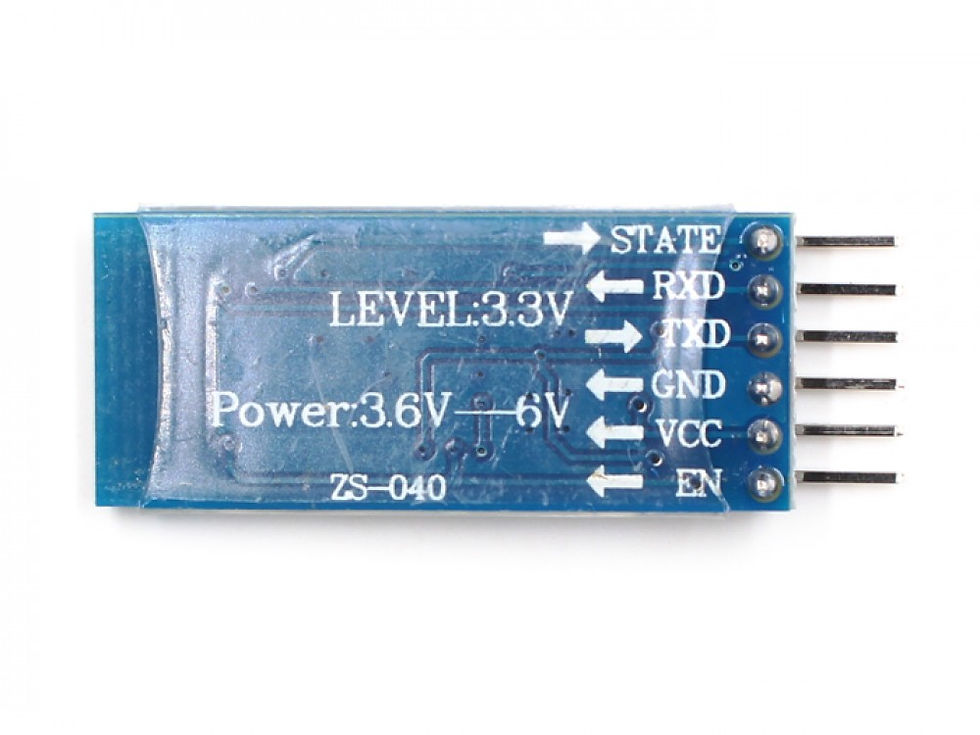
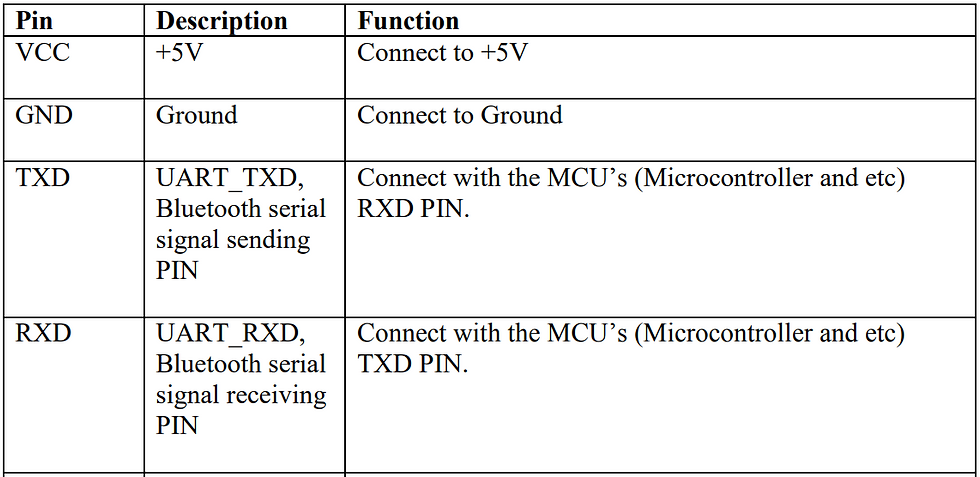
The figure below shows the pinout of the Bluetooth module along with a table identifying the description and function of each pin.
Connections with Arduino Board:
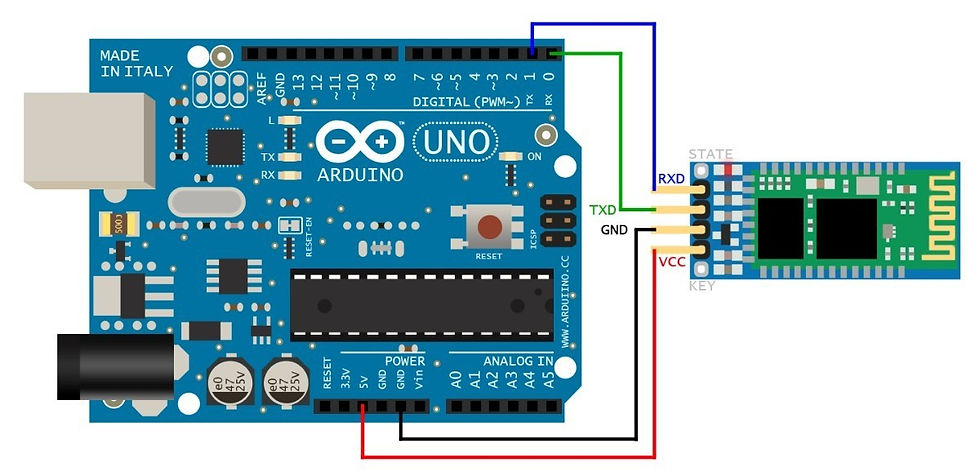
1. Connect with a male-female jumper, the VCC of the Bluetooth with the 5V pin in Arduino.
2. Connect with a male-female jumper, the GND of the Bluetooth with the Gnd pin in Arduino.
3. Connect with a male-female jumper, the transmit pin (TX) of the Bluetooth with pin 0 (RX) in Arduino.
4. Connect with a male-female jumper, the receive pin (RX) of the Bluetooth with pin 1 (TX) in Arduino.
Using the following connections, shown in the figure below, the serial communication between the Arduino and Bluetooth module is achieved, therefore when the module sends anything the Arduino will receive it at the serial input pin and vice versa.
Main functions to Read from and Write in Arduino:
1. Serial.begin() Function:
Description
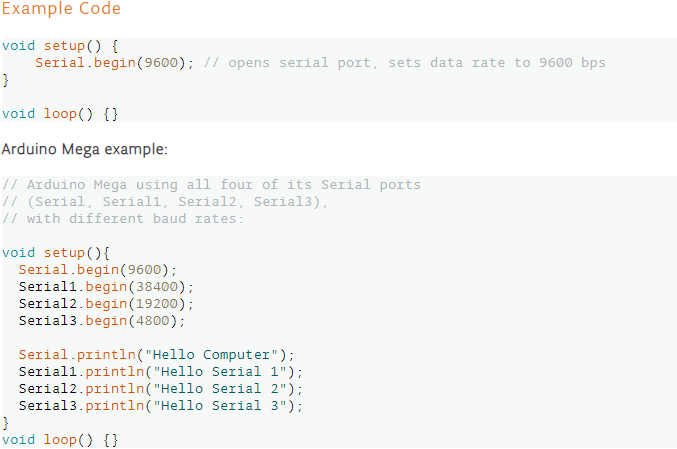
Sets the data rate in bits per second (baud) for serial data transmission. For communicating with the computer, use one of these rates: 300, 600, 1200, 2400, 4800, 9600, 14400, 19200, 28800, 38400, 57600, or 115200 as shown in the figure below. You can, however, specify other rates - for example, to communicate over pins 0 and 1 with a component that requires a particular baud rate. An optional second argument configures the data, parity, and stop bits. The default is 8 data bits, no parity, one stop bit.
Syntax
Serial.begin(speed) or Serial.begin(speed, config)
Arduino Mega only:
Serial1.begin(speed)
Serial2.begin(speed)
Serial3.begin(speed)
Serial1.begin(speed, config)
Serial2.begin(speed, config)
Serial3.begin(speed, config)
Parameters
speed: in bits per second (baud) - long
config: sets data, parity, and stop bits.
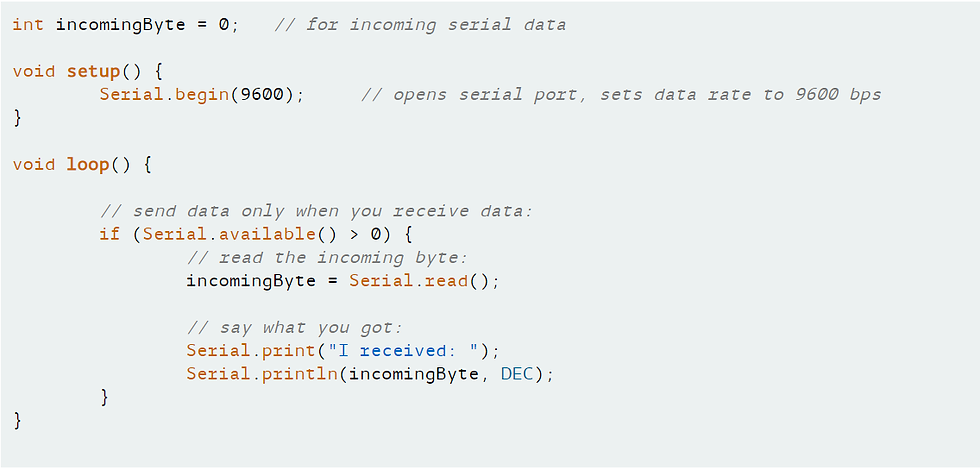
2. Serial.read() Function:
Description
Reads incoming serial data. read() inherits from the Stream utility class.
Syntax
Serial.read()
Arduino Mega only:
Serial1.read()
Serial2.read()
Serial3.read()
Returns
The first byte of incoming serial data available (or -1 if no data is available) - int. The read function is to read from the RX the received data.
Example:
3. Serial.print():
Description
Prints data to the serial port as human-readable ASCII text. This command can take many forms. Numbers are printed using an ASCII character for each digit. Floats are similarly printed as ASCII digits, defaulting to two decimal places. Bytes are sent as a single character. Characters and strings are sent as is. For example:
Serial.print(78) gives "78"
Serial.print(1.23456) gives "1.23"
Serial.print('N') gives "N"
Serial.print("Hello world.") gives "Hello world."
An optional second parameter specifies the base (format) to use; permitted values are BIN(binary, or base 2), OCT(octal, or base 8), DEC(decimal, or base 10), HEX(hexadecimal, or base 16). For floating point numbers, this parameter specifies the number of decimal places to use. For example:
Serial.print(78, BIN) gives "1001110"
Serial.print(78, OCT) gives "116"
Serial.print(78, DEC) gives "78"
Serial.print(78, HEX) gives "4E"
Serial.print(1.23456, 0) gives "1"
Serial.print(1.23456, 2) gives "1.23"
Serial.print(1.23456, 4) gives "1.2346"
You can pass flash-memory based strings to Serial.print() by wrapping them with F(). For example:
Serial.print(F(“Hello World”))
To send data without conversion to its representation as characters, use Serial.write():
Syntax
Serial.print(val) or Serial.print(val, format)
Parameters
val: the value to print - any data type.
Returns
size_t: print() returns the number of bytes written, though reading that number is optional.
Example:
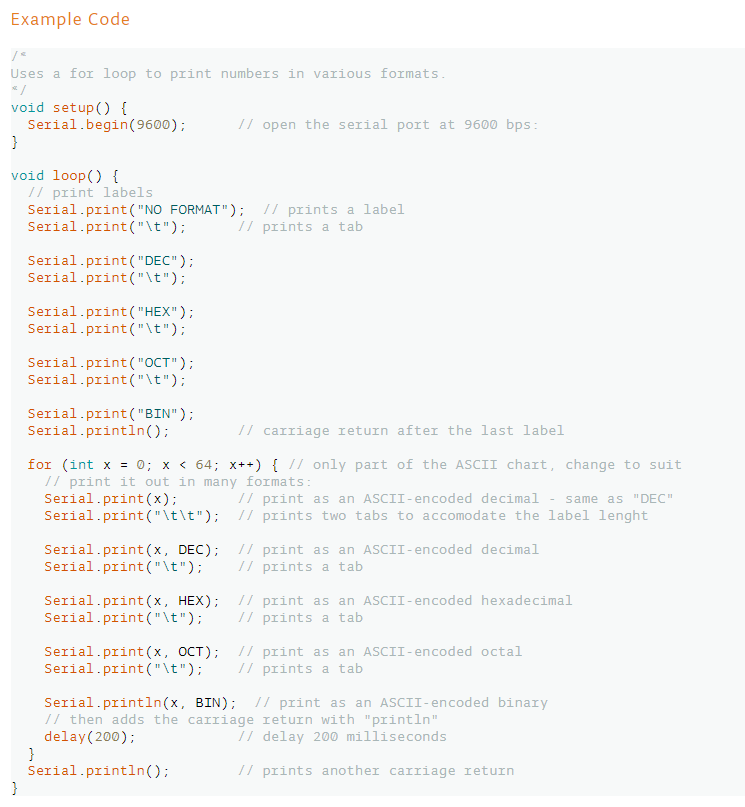
By using these functions, we start the communication channel between the Arduino Uno board and the Bluetooth module by Serial.begin and read from the Bluetooth with Serial.read, and print in the serial monitor by Serial.print.
How to use the Bluetooth module to control the motor?
We first connect the Bluetooth module to our motor circuit as shown above, then start writing our code. However, you need to have an application on your mobile phone which sends a number or char that the Bluetooth module chip receives and accordingly transmits to the Arduino through the serial connection between them, then we run the code. The mobile application we used for connecting to the Bluetooth module was called "BT Controller", but there were some problems with this particular application and the Arduino kept receiving a value of "-1" from it, which appeared on the serial monitor of Arduino IDE.
How the process works?
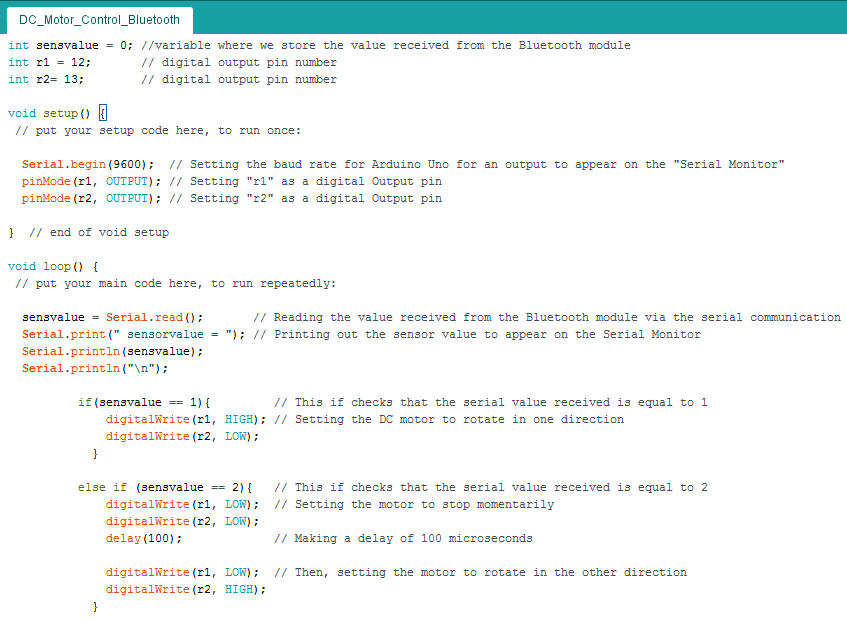
Using the application, we send one of three values to the Bluetooth module either 1, 2, or 3 which in turn is sent to the Arduino. The code contains a series of " If " conditions and depending on the value received, a decision is made on which if will be entered in order to change the direction of the motor's rotation or make it stop.
The code we wrote, along with all the associated comments that explain exactly the code structure and how the code's logic works, is shown in the figures below.

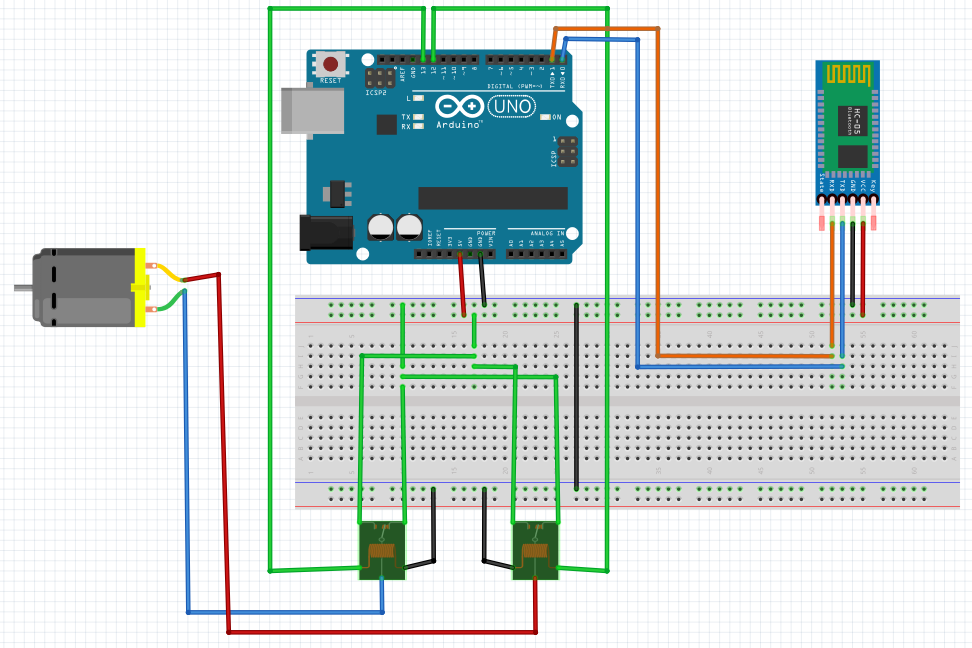
Here is also a figure showing the schematic breadboard circuit design of our motor control circuit which we made on the program called "Fritzing".


Khelraja brings fun and excitement with engaging virtual games for office teams. Their gulumber features and casino options add the right mix of competition and laughter. It’s a great way to build team spirit while also exploring who hits the jackpot like today winners in Mumbai lottery. Employees can enjoy easy online access and secure services that make gaming enjoyable during breaks. Khelraja focuses on both relaxation and teamwork through innovative gaming experiences. Perfect for virtual meetups, these office games help colleagues connect beyond work, making every playtime a memorable adventure filled with joy and motivation.